Draw Circle on Canvas Js
Creating and Cartoon on an HTML5 Canvas using JavaScript
Allow's explore what the canvas is and draw some shapes.
Prerequisites / Info
- This is part of the JS Game Dev Serial
- You should have some knowledge of JavaScript — I volition non explain irrelevant syntax such as for-loops
- Knowledge of ES6 Classes is helpful but not required
- Basic math/geometry knowledge
- Bones artistic skills
Starter Code
I moved this to a split up page to keep this article short and so I but have to update it in 1 place.
Final Code for this Tutorial
You tin can get all the lawmaking from this tutorial on the repository below. Proceed in mind there's also a lot of lawmaking included that'south not written here. This is because I added more code to create screenshots/diagrams for this tutorial.
Note: As the focus of this tutorial is not building a project, you don't need to copy every line exactly. In fact, since we'll be covering many examples, I encourage yous to play with information technology and make a mess.
What is the Canvas Element?
Some quick bullet points to innovate you to the canvas.
- Introduced with HTML version 5 to draw graphics using JavaScript
- Graphics can be 2D or 3D and information technology's able to apply hardware acceleration
- Used often today for creating games and visualizations (data or creative)
Steps to Getting Started with The Sail
When working with a canvas there are five steps to get started.
- Create the canvass element — give it an id, and a width/height (HTML)
- Add base styles — centre the canvass, add a background color, etc (CSS)
- In JavaScript, get your canvas element by using the id
- Utilize the canvas chemical element to get the context (your toolbox; more on it later)
- Use the context to depict
Nosotros'll do steps one and 2 in HTML/CSS, but y'all could do it in JavaScript if you prefer.
Steps one and 2 for this project
Our boilerplate / CodePen template already covered setting upwardly the basic styles and calculation a canvas element. For this project, I will change the canvas width/pinnacle to be 800x1200 to give us enough of space.
          // alphabetize.html
<canvas            id="gameCanvas"            width="800"            height="1200"></canvas>
I also changed the sheet groundwork to exist white and added some margin to the bottom.
          // styles.css
body {
            groundwork: #111;
            colour: #f8f8f8;
}          canvass {
            groundwork: #f8f8f8;
            padding: 0;
            margin: 0 auto;
            margin-lesser: 1rem;
            display: block;
}
Steps three and 4
Get the sheet chemical element past id, then use information technology to get the "2d" context.
document.getElementById('gameCanvas') — searches for an HTML element that has the id of gameCanvas. One time it finds the element, we can then manipulate it with JavaScript.
sail.getContext() — context is our toolbox of paintbrushes and shapes. The 2D context contains the set of tools we want. If you were working with 3D, you would utilize WebGL instead.
But expect what's with the function thingy wrapping all of this?
This is an immediately invoked function expression (IIFE). Nosotros use it to prevent our code from leaking out in the global scope. This has several benefits such as preventing players (if this were a game) from accessing your variables directly and prevents your code from colliding with someone else'southward code (such as a library or another script on the website). The semicolon is in that location in case some other lawmaking is loaded before ours and it doesn't have a semicolon at the finish.
We'll talk more than about security in a hereafter commodity, for at present, let's go to drawing stuff.
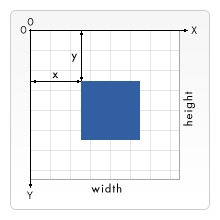
The Canvas Coordinate Organization
By default, the coordinate system starts at the top left. (X: 0, Y: 0) Moving down or to the right increases X and Y positions. You can play with the example below on this page.
Quiz: The Canvas Element
- How exercise you select the sail chemical element in JavaScript?
- How practise yous get the context?
- Where is X: 0, Y: 0 on the sheet by default?
Simple Shapes
Allow's make use of the 2d context object to draw shapes. Feel costless to reference the documentation page at any time.
There will as well be a link to each method nosotros use.
Merely expect for the DOM…
Earlier we draw anything, we want to make sure the DOM (HTML) finished loading to avoid any related errors. To do that, nosotros volition brand a part to handle the setup process we did above and listen for the DOMContentLoaded event. Nosotros will call this function init (for initialize).
Remember: everything stays within the IIFE wrapper. I won't be showing it in the example lawmaking from now on. If you lot ever get lost refer to the completed project hither .
We want our canvas and context variables to be available to all of our functions. This requires defining them up summit and then giving them a value in the init function once the DOM loads. This completes our setup.
Note: A more scalable option is to accept the context variable equally an argument to our drawing functions.
Rectangles / Squares 🔲
Let'south get-go by creating a foursquare:
Inside of our init function, nosotros use context2D.beginPath to tell the canvas nosotros want to start a new path/shape. On the next line, nosotros create and depict a rectangle (a square in this case).
At that place are two unlike methods we use to describe the path to the screen:
ctx.strokeRect(x, y, width, height) — this creates a "stroked" rectangle. Stroke is the same affair as an outline or border
ctx.fillRect(x, y, width, height) — similar to strokeRect but this fills in the rectangle with a color
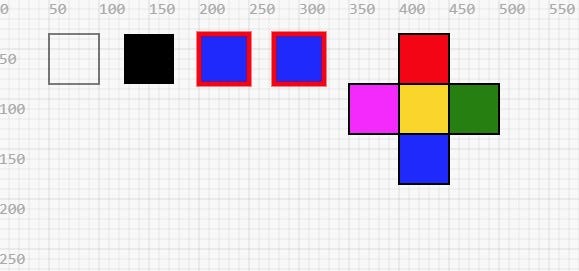
The Effect:
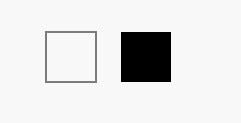
At that place are a few things to note here:
- The colors default to black stroke and blackness fill.
- The origin point or 10: 0, Y: 0 for these shapes are at their tiptop left, similar to the canvass.
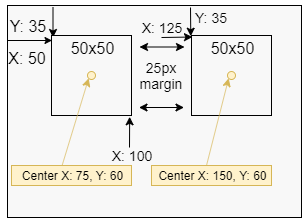
- I just picked a random x, y for the start foursquare and and then added 50 + 50+ 25 (previous square 10 + previous square width + 25px margin) for the ten position.
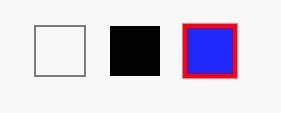
What if we want to change the color/manner? Let'due south add a red outlined foursquare that's also filled with blue.
Position first:
- X = 200 previous square width + previous position + 25px margin = 50 + 125 + 25
- Y = 35 We will keep it in the same row
- The size will exist the same (50 x 50)
          ctx.beginPath()
ctx.strokeRect(200, 35, 50, l) // plugging in our new position
Just wait… we want a fill AND a stroke, does this mean we have to draw two squares? Yous tin draw ii squares but nosotros will make apply of several other methods instead.
The Result:
ctx.rect(x, y, width, height) — this is similar the other two rectangle methods, just information technology does not immediately draw it. It creates a path for the square in memory, we so configure the stroke, fill up, and stroke width before calling ctx.fill and/or ctx.stroke to draw it on screen
ctx.strokeStyle = 'any valid css color' — sets the outline/stroke color to any string that works in CSS. i.eastward. 'bluish', 'rgba(200, 200, 150, 0.5)', etc
ctx.fillStyle = 'any valid css color' — same as above but for the fill
ctx.lineWidth = number — sets the stroke width
ctx.fill up() — fills the current path
ctx.stroke() — strokes the electric current path
Cartoon any shape e'er follows these steps:
- Set the styles — optional and tin can be set any time before rendering
- Begin the path — offset creating the virtual path (non drawn to screen yet)
- Employ the path functions to create a shape — i.e. the
rectmethod - Depict the path to the screen — using fill or stroke
Notation: We did not demand to employ the
ctx.rect()function just to modify the colors, we used it considering nosotros wanted both a stroke and a fill. You tin can just as easily setctx.fillStyleand usectx.fillRect()
Setting the fill or stroke manner volition crusade any shapes created after, to have the same style. For example, if we add a quaternary square using the code below it would accept the same style every bit the tertiary square.
          // 4th square, uses the same style defined previously
ctx.beginPath()
ctx.rect(275, 35, 50, 50)
ctx.fill()
ctx.stroke()
Effect:

Anytime you want to add a fill/stroke to your shapes, explicitly define the styles.
Optimizing our Code with Classes
Making use of classes nosotros tin create a robust Rectangle object and clean upwards our code.
Classes are functions that create Objects. We want to create Rectangle objects that incorporate information about themselves, such as their position, styles, area, and dimensions.
I won't go into much detail on classes as it's not required and you can go by with normal functions. Check the MDN documentation page on classes to larn more than about them.
Classes are optional and if the syntax confuses you, then just think of it as an object with methods and properties. Classes aside, two more canvas functions were introduced in the draw method:
ctx.save() — saves the electric current styles
ctx.restore() — restores the last saved styles
We use these methods to forestall the issue we saw with the fourth square that had unexpected colors.
Canvas stores styles on a stack structure. When we call ctx.save() it pushes the current styles onto the stack and calling ctx.restore() pops information technology off the stack.
I only saved 1 set of styles in this animation simply y'all can save as many times every bit you want and restore the about recent styles. Note that saving does non reset the electric current styles.
Styles include:
strokeStyle, fillStyle, globalAlpha, lineWidth, lineCap, lineJoin, miterLimit, lineDashOffset, shadowOffsetX, shadowOffsetY, shadowBlur, shadowColor, globalCompositeOperation, font, textAlign, textBaseline, direction, imageSmoothingEnabled
— MDN
We tin now start putting this Rectangle class to utilise:
The Upshot:

Note: I added a grid for the screenshots. Nosotros'll be making a filigree at the end of this section.
Nosotros can keep reusing the grade to make more squares/rectangles:
Nosotros create an array and populate it with new Rectangles positioned based on the mySquare object created earlier. And so we loop over the assortment and call the draw method on every square.
What do we get from all that lawmaking?
Well… it'due south something.
I know this is all boring and tedious but nosotros've covered the basics of canvas and you lot've at least seen what a course looks like now. Allow's finish creating more shapes. (it'll become quicker from now on I promise)
Lines 🔗
Rectangles are the only pre-defined shape with sail, we create other shapes on our own. Nosotros tin can use lines to build the foundation of these shapes.
The Outcome:
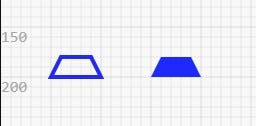
New Methods:
ctx.moveTo(x, y) — you tin can think of this as moving our virtual "pen", we use information technology to ready the starting bespeak for the first line
ctx.lineTo(10, y) — creates a line to X, Y; the starting indicate is the last position of our "pen". This allows the states to start new lines at the endpoint of previous lines.
ctx.closePath() — when using a stroke we need to call this to draw the final line and close the path. Make full will automatically close the path
Note: If y'all need curved lines then you can use Bézier curves with the quadratic or cubic bézier bend functions. I'll cover them in some other tutorial to keep this one from becoming too long.
Text 🔤
If y'all ever worked with any kind of text editor similar to Microsoft Word or whatever of Adobe's tools, then these options volition exist familiar to you.
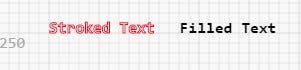
ctx.strokeText(text, x, y) — creates the text path and strokes it
ctx.fillText(text, ten, y) — same as above just fills the text
ctx.font(CSSFontString) — set the font using the CSS font format
ctx.measureText(text) — performs some calculations using the electric current styles and returns an object with the results, including the calculated width
The rest of the options are cocky-explanatory or require cognition of font design, which is exterior the telescopic of this tutorial.
- ctx.textAlign
- ctx.textBaseline
Circles & Partial Circles (arcs) 🔴
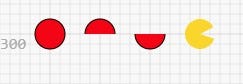
The just new function here is the arc method.
arc(ten, y, radius, startAngle, endAngle, antiClockwise)
Ten, Y — defines the position of the center point, not the top left
radius — the size of the circumvolve/arc
startAngle, endAngle — I think these are cocky-explanatory but information technology's important to annotation that these angles are in Radians not degrees.
Math Aside: 1π (Pi) radians is equal to half a circumvolve, 2π gives you a total circle.
Watch this video for more on the math of a circle
Triangles 🔺
As there are no triangle functions, we accept to make them ourselves using lines.
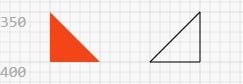
Goose egg new here. Refer to the sections above if you lot're lost. (or ask in the comments)
Quiz: Basic Shapes
- What arguments does the
rect(_, _, _, _)function take? - After yous've used the
rectfunction, what two methods tin can describe the rectangle to the screen? (the same functions for whatsoever path) - What role can create circles?
- What two properties can we set to change the fill and outline styles?
- How do you set the starting position when using
lineTo(x,y)
Answers: (links to related MDN pages)
- Rect function docs
- Cartoon method one, cartoon method 2
- Office to depict circles
- strokeStyle, fillStyle
- ctx.moveTo(x,y)
Challenge: Visualize the Canvas Coordinate Arrangement
Use what you learned to depict a coordinate aeroplane or grid with X and Y starting at the height left and terminate where the canvas ends.
Examples
Tips
- Use for loops to create multiple lines
- It can exist a full filigree, just text, or lines with tick marks... Make the filigree you will want to use
- As nosotros haven't covered animation even so, don't worry about animating information technology. The example above was blithe only for sit-in purposes.
Solution
Don't worry if y'all didn't solve it, this ane is challenging.
I started by making a new JS file and loading it instead of the example shapes from before.
<!-- index.html --> <!-- <script src="js/index.js"></script> --> <script src="js/gridSolution.js"></script>
Add together the initial setup to your new JS file.
Now, decide if y'all want to brand a reusable Grid class or create something simpler. I volition keep it simple for this instance solution by using only one function.
Look at the to a higher place code, then attempt to fill up in the blanks yourself if you haven't already solved information technology. The adjacent snippet will be the consummate code.

Experience free to tweak your grid and save it for future use. I saved the blithe one equally an NPM package to use with upcoming tutorials.
Terminal Claiming: Describe Some Art
Now it's time to put everything yous've learned to employ, here's your challenge:
Draw a picture using a combination of the shapes we learned.
Find some reference images or brand something up.
Ideas
- Emojis / Faces
- Flags (Japan's flag? 😂)
- 2D Game/Cartoon Characters
- Logos
- Charts (bar chart, pie nautical chart, etc) — a little more than advanced and I'll be doing some other tutorial on charts simply if you desire to endeavour it on your own go for it.
- Mural — describe a house, some grass, a sun or perchance a starry night heaven
- Search for examples on CodePen to go ideas (set to be overwhelmed by the crazy art some people brand)
Tips
- Use
sail.height / twoandcanvas.width / 2to get the eye X, Y of the canvas - If you did the filigree challenge from earlier, now is a good time to use information technology
- If your drawing needs a lot of curves, wait into the bezier curve functions: quadraticCurveTo and bezierCurveTo
- Try finding some examples on CodePen
- Keep it simple. This challenge is simply to practice cartoon shapes on the canvas, not to create some circuitous game character.
When y'all terminate share a link to your CodePen / GitHub repository in the comments.
Reflection
What did you struggle with the most? Or was everything a breeze? What could accept been unlike? I would love to hear your feedback in the comments. Otherwise, note what you lot struggled with and spend more time researching and reviewing that topic.
Resources and Links
Dorsum to Alphabetize Page
Thanks for Reading!
I had to cut a lot of information to keep this tutorial from getting likewise long but we'll be covering pretty much everything throughout the series.
I would love to hear your feedback and questions! Leave a comment below or message me on Twitter.
Source: https://codeburst.io/creating-and-drawing-on-an-html5-canvas-using-javascript-93da75f001c1
Post a Comment for "Draw Circle on Canvas Js"